
Contents
In Japan, you bring a single shot from a photo booth to the passport counter — and hearing “this doesn’t meet the spec” is anything but rare. If you are told to reshoot when your departure is near, you have to carve out weekday time all over again, and it can even ripple into your flight and hotel bookings.
This article organizes the12 most common reasons for rejectionfrom information published by the Ministry of Foreign Affairs and prefectural passport centers, covers how this differs from My Number, and walks throughthe concrete steps to align a home photo to 0.1mm.
Why reshoots are so common at passport centers
Thefacial-photo specpublished by the Ministry of Foreign Affairs is built around the machine-readable standard set by the International Civil Aviation Organization (ICAO). Identity verification on departure, facial recognition at immigration — all of it is a system that assumes a photo that meets the spec exactly.
A discrepancy of just a few millimeters is judged “out of spec.” A photo booth leaves the shooting position to the machine and cannot absorb individual differences in sitting height or posture. Even when you use a smartphone at home, aligning tothe 32–36mm / 2–6mm tolerancesby eye while you shoot is a near-impossible feat.
The 12 patterns that get a passport photo rejected
When you organize the rejection reasons that the Ministry of Foreign Affairs, prefectural passport centers and multiple photo-studio sites all cite in common, they boil down to the following 12 patterns.
- The face length falls outside the 32–36mm range— the face is too large (over 36mm) or too small (under 32mm). This tends to happen because of the gap from the standard body type a photo booth assumes.
- The margin from the top of the head to the top edge falls outside 2–6mm— cases where the volume of the hairstyle leaves almost no margin, or where the margin is over 10mm and the face looks too small.
- The center of the face is off to one side— at the level where a passport center staff member sees it and judges “it’s visibly off at a glance.”
I took an ID photo, but the center came out fairly off. (Off enough that you can tell at a glance.) I want to use it for job hunting — should I reshoot it?
- The gaze is not facing the camera straight on— cases where the gaze drifts up or down, or faces to the side. The ICAO standard requires “both eyes facing the camera lens directly.”
Please tell me the trick to ID photos! No matter how many times I reshoot, my gaze ends up drifting upward.
- Color, shadow, objects or patterns appear in the background— a “plain” background in white, light gray or a pale color is required. Part of a piece of furniture, a wallpaper pattern, or a shadow are all NG.
- The expression is off (an open-mouthed smile, teeth showing)— as a rule, a neutral expression with the mouth closed. A very natural, faint smile tends to be tolerated, but to be safe, shooting with a neutral expression is the surer choice.
- Glare on the glasses / frames covering the eyes— lighting reflecting off the lenses, frames overlapping the eyebrows or eyes, sunglasses or tinted lenses — these are all NG. We have gathered seven countermeasures — adjusting the lighting angle, the frames, switching out blue-light-cut lenses, and more — in7 techniques for a glare-free ID photo with glasses.
- Bangs covering the eyebrows or eyes— both eyes need to be clearly visible. Side hair, too, must not cover the outline of the face.
- A hat, headband or large accessories— hats are not allowed except for religious reasons. Earrings or piercings larger than your ear also become a factor in the judgment.
- Clothing that blends into the background, or is too flashy— wearing white clothes against a white background makes the outline of the face disappear. Conversely, flashy patterns and primary colors are also safer to avoid.
- The shooting date is more than 6 months before the application date— there are cases where the counter asks “when did you take this,” and an old photo will be rejected.
- Excessive image editing / beauty filters— editing heavy enough to change the shape of the face undermines the role of identity verification, so it is NG. You need to turn off your smartphone’s “beauty” feature when you shoot.
Knowing the spec accurately, to the millimeter
Here is the passport photo spec set by the Ministry of Foreign Affairs, organized item by item.
| Photo size | 45mm tall × 35mm wide |
|---|---|
| Face length (chin tip to top of head) | 32–36mm (34±2mm) |
| Top of head to top edge | 2–6mm (4±2mm) |
| Gaze | Facing the camera lens directly |
| Background | White / light gray (plain) |
| Expression | Neutral as a rule, mouth closed |
| Shooting period | Within 6 months before the application date |
The same spec is also clearly stated in the Ministry of Foreign Affairs’notes on photos for online applications. Beyond the size and dimensional standards, it is safer to also check the requirements on the image-data side (pixel count, JPEG format and so on).
Let AI align you to the ICAO-based 35×45mm
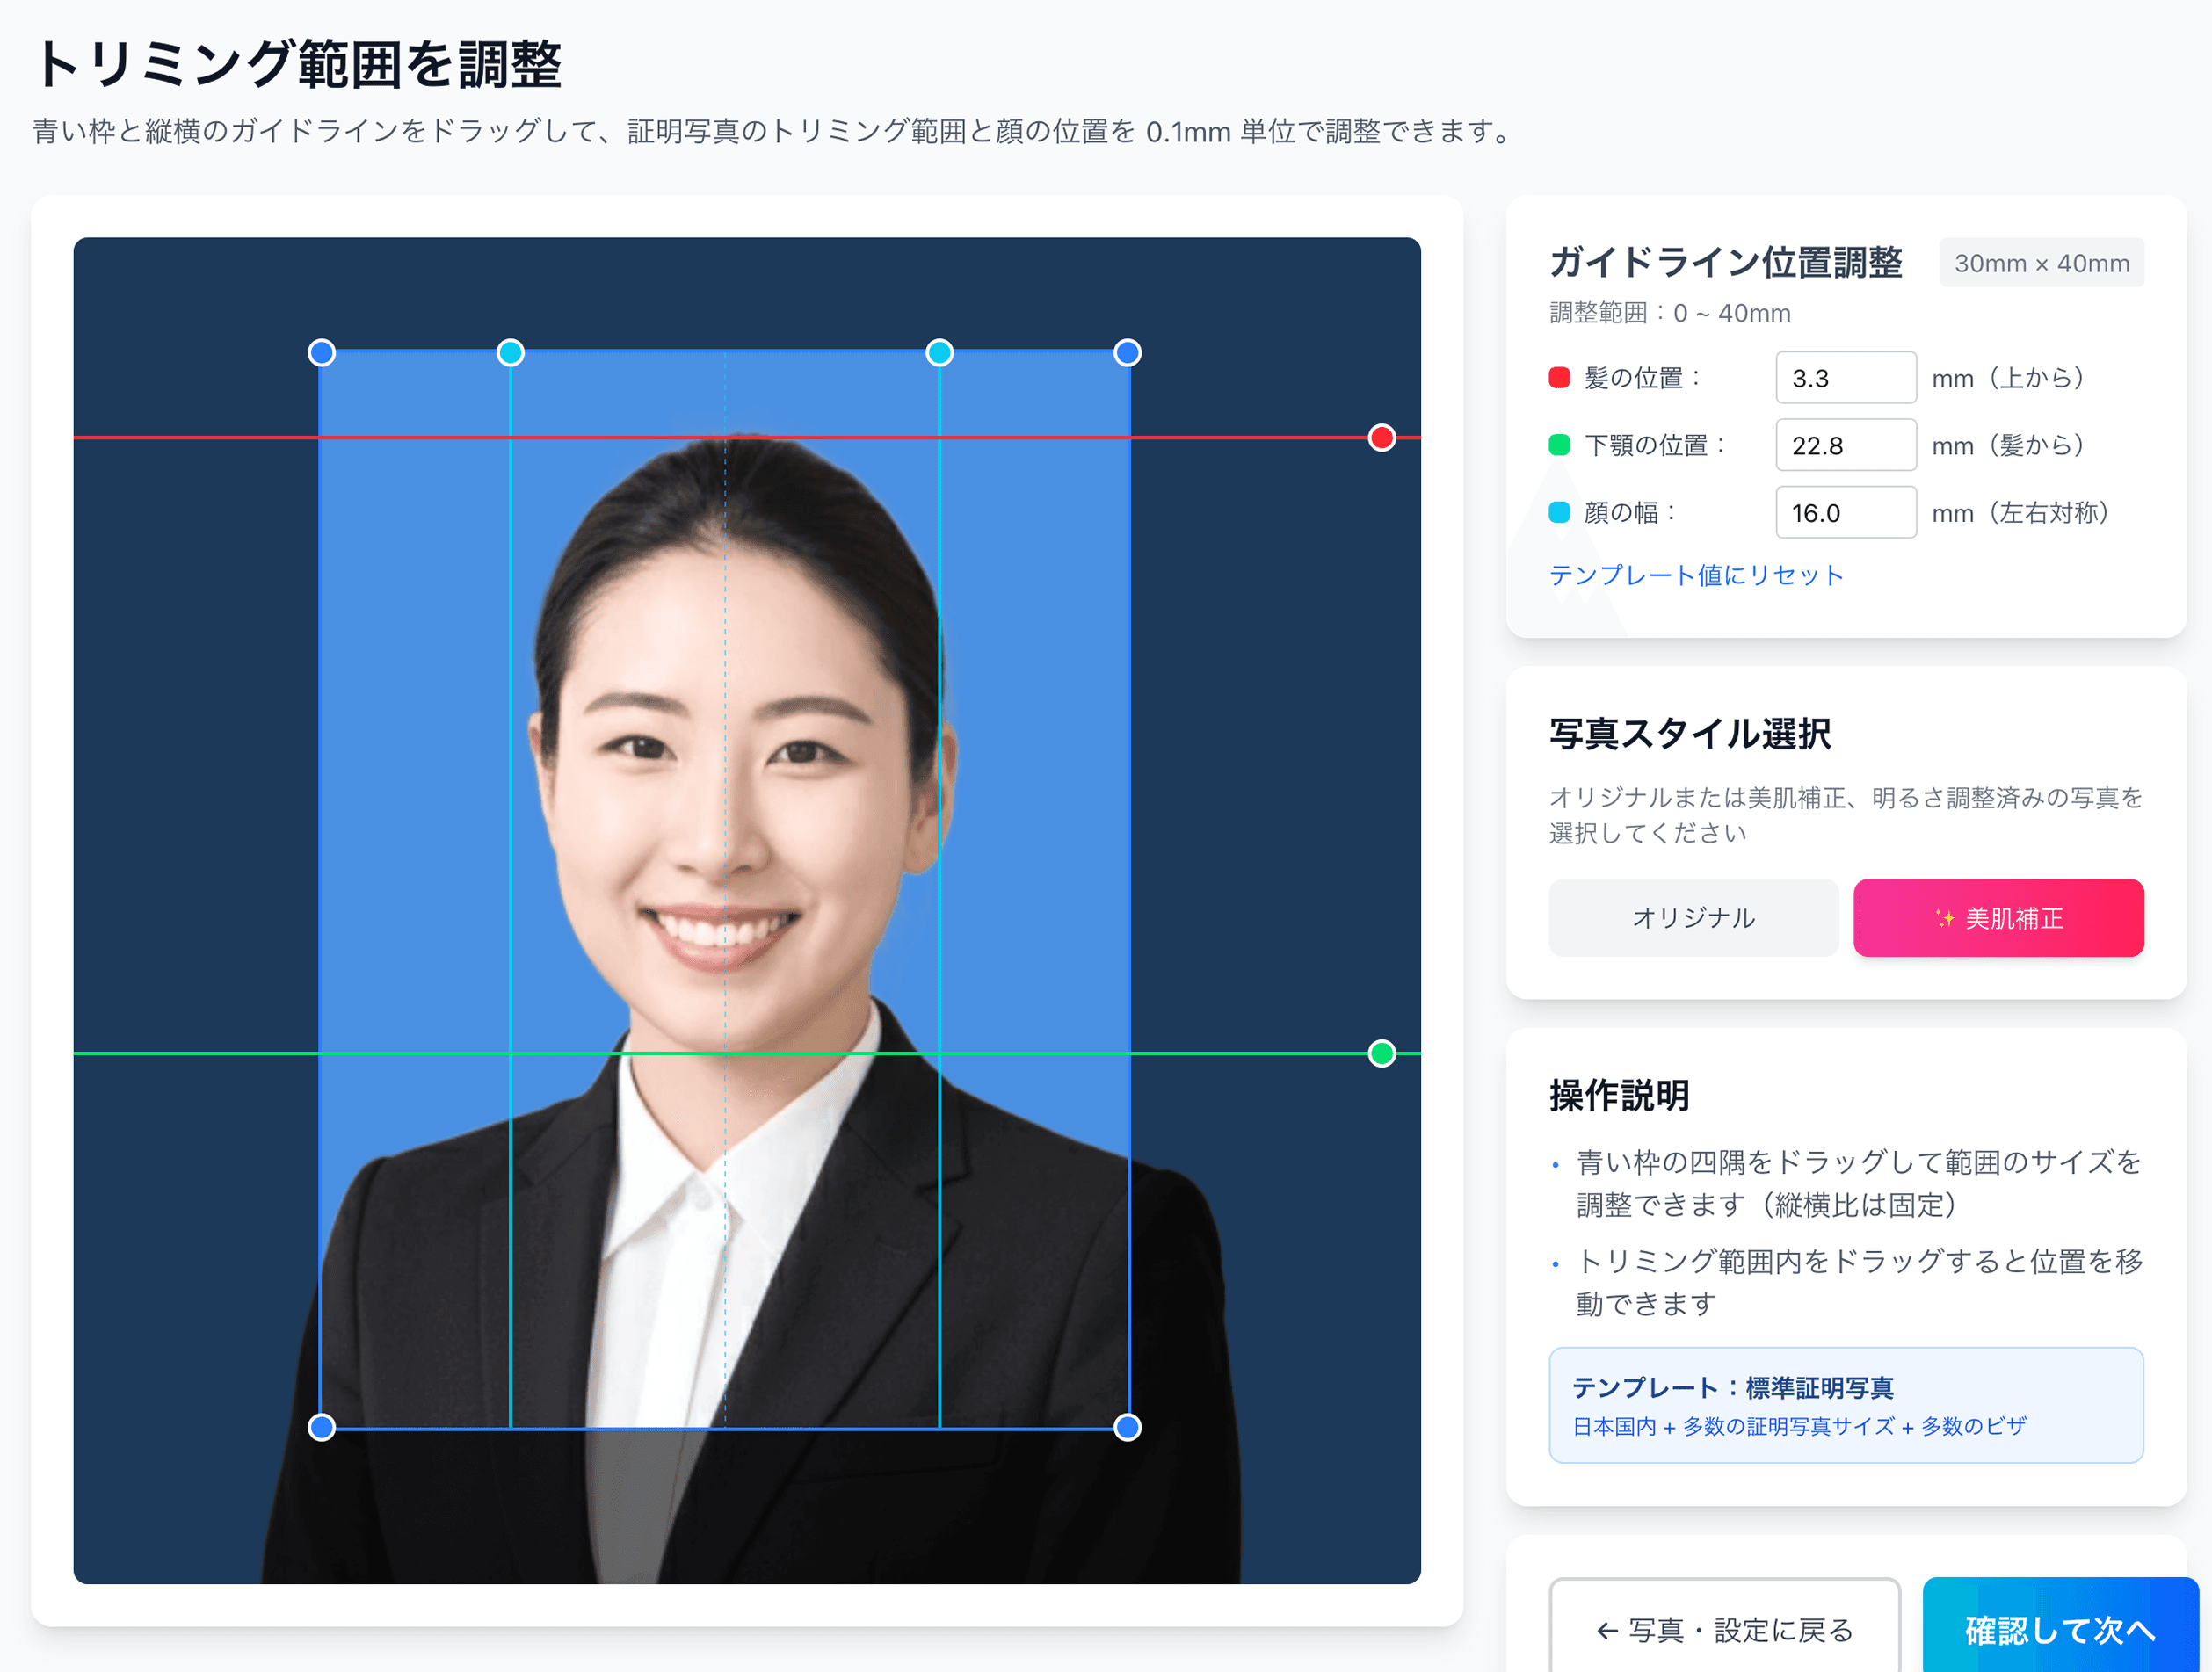
Ramune AI ID Photo has a positioning screen informed by ICAO’s facial-recognition standard, so you can confirm and align chin-to-crown to the midpoint of 34mm and the top-of-head margin to 4mm. For ¥200, you can reshoot as many times as you like.
Make a passport photo for ¥2003 pitfalls unique to passports
The size and the tolerances for face length and margins are thesame standard for passports and My Number. The reason reshoots are still common for passports lies in something other than the numbers.
How to align the face position to 0.1mm
Ramune AI ID Photo has a screen that lets youfine-tune the face position up, down, left and right in 0.1mm incrementson the photo after shooting. Aligning chin-to-crown to exactly 34mm and setting the top-of-head margin to 4mm, the midpoint of 2–6mm — these fine adjustments are completed by dragging on the preview.
- 1
Take a front-facing photo
With a smartphone or a DSLR, shoot from the front against a white or light-gray wall. We recommend shooting where natural light hits your face evenly. Keep a neutral expression with the mouth closed, and watch out for glare on glasses and bangs blocking the eyes.
- 2
Upload at the passport spec
Just select “Passport 35×45mm” from among the 105 specs and send the photo. The AI automatically removes the background and provisionally places the face position.
- 3
Fine-tune the face position in 0.1mm increments
Where to set the top-of-head margin within 2–6mm and where to align the gaze can be finely adjusted with on-screen sliders. You can reshoot as many times as you like, free of charge.
- 4
Pay the ¥200 fee and receive the print sheet
You get a sheet with cut marks and several photos laid out on L-size paper. One photo is enough for a passport application, but having 2–3 spares gives you peace of mind.
- 5
Print at the convenience store with the QR code
Just hold the QR code up to the multi-copy machine at a major convenience store. You can print L-size for ¥30–¥40, and simply cutting along the cut marks with scissors finishes it to 35×45mm.
Make a single trip to the passport center do it — ¥200, ¥230
For ¥230 total — ¥200 to shoot + ¥30 for the L-size convenience-store print — you get a photo solidly aligned to the ICAO standard, already cut. Reshoots after payment are unlimited; you can fine-tune to your satisfaction before locking in the print data.
Create one easily for ¥200Pre-application passport checklist: 12 items
Right before applying, check the following 12 items one by one. If even one applies, redoing it on the spot is far faster than re-applying on a later day.
What to do when the passport center tells you to reshoot
If you are told “this doesn’t meet the spec” at the counter, you can keep the impact to a minimum with the following steps.
Since the operational revision in March 2025, a passport takesroughly 9–12 business daysfrom application to issuance (9 business days at a passport center counter, 11–12 business days via a municipal counter). Ideally you finish applying 2–3 weeks before departure, but if you can’t make it in time, there is also the emergency passport system (a passport issued in a short period, limited to special circumstances such as the death or serious illness of a relative). Consult at the counter.
Related links
- All 105 supported specs
- Convenience-store printing steps
- Why 80% of My Number photos fail
- Convenience-store printing: complete guide
- Job-hunting photos & recruiters’ honest take
- Photo reprints: the konbini guide
- Pricing details
FAQ
What size is a passport photo in cm?
Can I reuse my My Number card photo for a passport?
Is a natural smile OK?
Can I keep my glasses on for the photo?
If the passport center asks me to reshoot, is there a fee?
In time even the day before departure — perfectly aligned to the passport spec for ¥230 total
The wait for a studio booking, the one-shot gamble of a photo booth, the pricey add-on orders at a photo studio. With an AI tool you avoid all three inconveniences and can finish from shooting to printing in about 30 minutes, even the day before departure. Reshoots are free, as many times as you like.
Create one now (¥200)Ramune Editorial ・ Published: May 8, 2026 ・ Last updated: May 16, 2026
Facts in this article are verified against primary official sources before publication.