
Contents
In Japan, you apply for a My Number card (the national ID) and get a notice saying “your photo does not meet the spec” ── across the tallies of several photo studios, nearly 8 in 10 online re-applications are caused by a defective face photo. That can push issuance back by 1–2 weeks and even spill over into moving-in notifications, opening a bank account, or procedures for your children.
This article sorts out why defects happen so often from the spec side, draws on the voices of users posted to Yahoo! Chiebukuro, and explains the concrete steps to align face position to within 0.1mm. It also covers how to use the ¥200 AI tool and the flow through convenience-store printing.
Why nearly 80% of My Number photos are flagged as “defective”
Because a My Number card online application lets you upload a photo shot on your smartphone as-is, it is convenient — but the flip side is that checking the spec is left up to the user. The Digital Agency’s My Number Card Comprehensive Site, “Face Photo Checkpoints”, lines up more than 10 check criteria, including size, position, no background, no expression and no hat.
In an online application you specify the crop position yourself, so a gap of a few pixels on screen translates directly into a gap of millimeters when printed. “I thought I centered it in the frame,” yet the application data is out of spec — that kind of gap happens constantly.
The 7 patterns that most often get rejected
The reasons a photo actually gets flagged as “defective” boil down to roughly the following seven. Let’s look at them alongside real voices posted to Yahoo! Chiebukuro.
- The vertical length of the face is outside the 32–36mm range── common with selfies, especially cases where the vertical length of the face exceeds 36mm.
- The margin above the head does not land within 2–6mm── representative examples are a margin of almost zero (the head is cut off) or 1cm or more (the face is too small).
- The center of the face is off from the center of the frame── a question that comes in every year, mainly during job-hunting season, and the same judgment happens with My Number applications too.
I took an ID photo, but the center of the photo came out fairly off. (Off enough that you can tell at a glance.) I want to use it for job hunting — should I re-shoot it?
- The gaze is pointing up or down── there is no end to people asking about this, saying it never gets fixed no matter how many times they re-shoot.
Please tell me the trick to ID photos! No matter how many times I re-shoot, my gaze ends up pointing upward.
Answer (a former hiring manager): “Getting it shot at a photo studio is best. For about ¥8,000, a professional photographer guides you and even does light retouching.”
- A color, shadow or object appears in the background── a plain white, light-colored or light-gray background is required. A wallpaper pattern, a shadow, or a piece of furniture showing up is a no-go.
- Glasses reflection or eyes blocked by your bangs── the same worry gets shared over and over for resumes too. Lighting reflecting off the lenses, or a composition where the frames cover your eyes, is also spelled out in J-LIS’s official no-go examples. For detailed countermeasures, see 7 techniques for a glare-free ID photo with glasses.
My bangs are a little long, and one eye ended up more than half hidden by my bangs. I wanted to re-shoot, but the time limit ran out before I could. I’m worried about whether it’s a problem if both eyes aren’t visible.
- Expression, an open mouth, a hat, or a shooting date over 6 months old── it is a strict standard where even a slight smile counts as defective if your mouth is open. The shooting date must also be “within 6 months before the application date.”
Nail the spec down to the millimeter
The face-photo spec for a My Number card is spelled out as follows.
| Photo size | 45mm tall × 35mm wide |
|---|---|
| Vertical length of face (chin to crown) | 34±2mm (32–36mm) |
| Top of head to top edge of photo | 4±2mm (2–6mm) |
| Background | White, light color, or light gray |
| Shooting period | Within 6 months before the application date |
Cases of mixing it up with the resume size of “40mm tall × 30mm wide” and sending that in are common too, and the Digital Agency’s official FAQ repeatedly calls attention to it. A photo for a My Number card is 35×45mm. Make sure you have at least this one point locked down.
Leave the 35×45mm spec to AI and align it in one go
Ramune AI ID Photo supports 105 specs. Just select “My Number card” and you can align the size, the 34mm vertical face length and the 4mm top margin right on the screen. Re-shoot as many times as you like until you’re satisfied, for ¥200.
Create a My Number photo for ¥200Why booths and selfies fail to hit the precision
The ID-photo booths at Japanese convenience stores (konbini) and stations spit out a sheet of 3–6 photos for ¥700–1,500, but the shooting position is left to the machine’s guide. If your sitting height differs from the standard, your posture leans slightly forward, or your head is lower than expected ── and these factors stack up — the margin above your head ends up over 7mm, or conversely your head gets cut off.
Selfies are the same: a smartphone’s built-in camera has no spec frame guide. Hitting the precision of “within 1–2mm of the frame line is fine, but over 2mm means a re-shoot” by aligning it yourself while peering through the viewfinder is an extremely tall order.
A photo studio runs ¥1,500–10,000 with a pro’s fine adjustments, but the cost and time burden is on the heavier side. The gap left by services answering the “cheap, yet to spec” need is what has been producing defect cases.
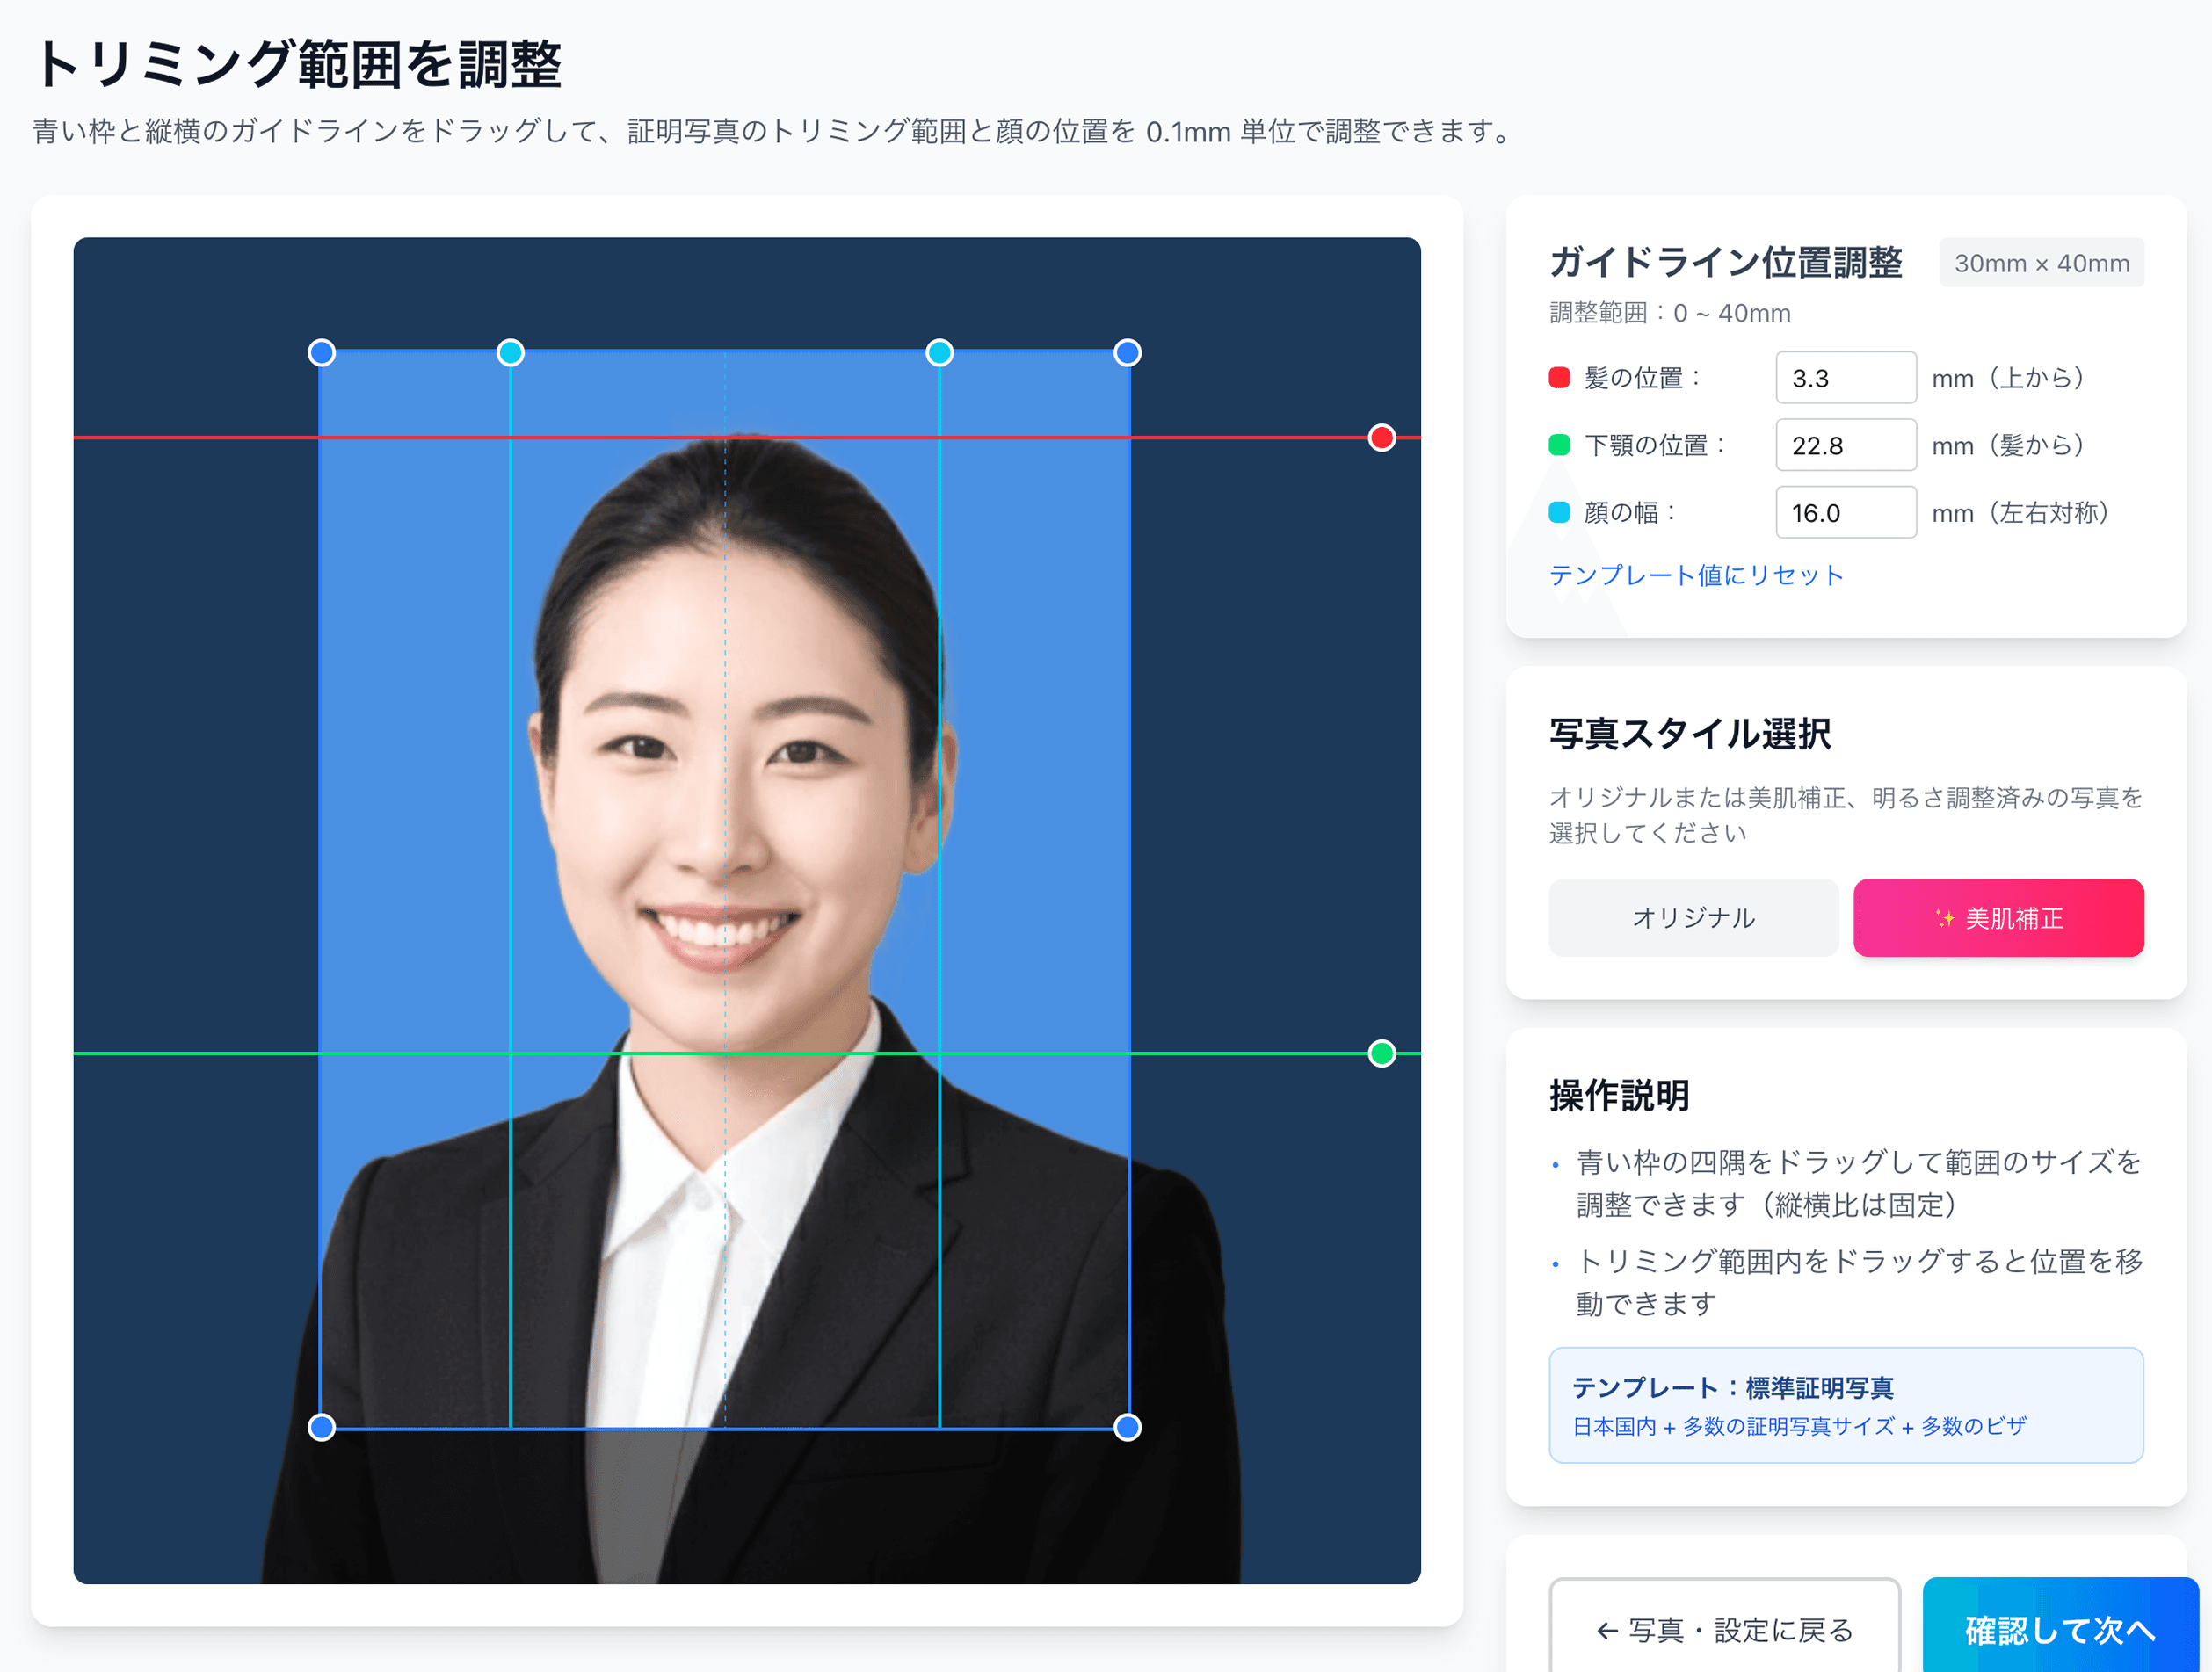
How to align face position to 0.1mm precision
Ramune AI ID Photo has a screen that lets you fine-tune the face position up/down and left/right to within 0.1mm on the photo after shooting. Operations like setting the chin-to-crown length to the 34mm midpoint, and aligning the margin above the head to 4mm — the midpoint of the 2–6mm range — are done just by dragging on the preview.
- 1
Shoot a front-facing photo with a smartphone or a DSLR
Pick a white or light-gray wall for the background, and we recommend shooting somewhere natural light hits your face evenly. The safe bet is a neutral expression, mouth closed, and glasses off.
- 2
Upload it under the My Number spec
Just select “My Number card 35×45mm” from the 105 specs and send the photo. AI automatically removes the background and provisionally places the face position.
- 3
Fine-tune the face position to within 0.1mm
You can finely adjust where in the 2–6mm range to place the margin above the head, and where to set the gaze, using the on-screen slider. Re-shooting is free no matter how many times you do it.
- 4
Pay the ¥200 fee and receive the print sheet
A sheet with cut marks, laid out with multiple photos on L-size, is prepared for you.
- 5
Print at a convenience store with the QR code
Just hold up the QR at a major convenience store’s multi-copy machine. You can print L-size for ¥30–¥40, and by simply cutting along the cut marks with scissors it finishes to 35×45mm.
Break out of the re-application loop — 0.1mm precision for ¥200
Instead of paying for the photo all over again every time you’re bounced for a defect, one ¥200 payment lets you re-shoot as many times as you want. A QR code for the L-size sheet (4 frames) is issued automatically, and you’re free to make reprints later.
Create it easily for ¥200Final checklist before your online application
Right before applying, check each of the following items one by one. If even one applies, redoing it on the spot is far faster than a later re-application.
On Ramune AI ID Photo’s adjustment screen, the three dimension-related items among these (face length, margin and center) are displayed as numbers, so you can judge them without relying on the naked eye.
What to do if you still get a “defective” notice
If you get a notice after your online application saying “your photo does not meet the spec,” the first thing to do is check the reason for the defect. The notification email and Mynaportal state the specific reason — “size out of spec,” “face position inappropriate,” “shadow in the background,” and so on.
A My Number card is something you use for 10 years if you’re 18 or older, and 5 years if you’re under 18. There is plenty of value in getting one photo you’re happy with. Just by switching to a 0.1mm-precision adjustment tool, the cycle of re-applications stops.
Reference links
- All 105 supported specs
- Convenience-store printing steps
- 12 passport rejection patterns
- Convenience-store printing: the full guide
- Job-hunting photos & recruiters’ honest take
- Photo reprints: the konbini full guide
- Pricing details
FAQ
What size is a My Number card photo in cm?
Is there a standard for face size (chin to crown)?
Can I use a photo taken more than 6 months ago?
Is it okay to keep my glasses on while shooting?
If an online application is flagged as “defective,” do I always have to re-shoot?
From ¥230 — 1/3 of an ¥800 photo booth, 1/10 of a ¥3,000 studio
¥200 to create plus ¥30 for a convenience-store L-size print, for ¥230 total. Where a photo booth is one shot with paid re-shoots, the AI tool gives you unlimited re-shoots after payment. Aim to pass My Number on the first try.
Create one now (¥200)Ramune Editorial ・ Published: May 7, 2026 ・ Last updated: May 16, 2026
Facts in this article are verified against primary official sources before publication.