Free to try — upload a phone photo and preview your AI-processed result. Pay ¥200 only if you like it
📸Free to try — upload a phone photo and preview your AI-processed result. Pay ¥200 only if you like it📸Free to try — upload a phone photo and preview your AI-processed result. Pay ¥200 only if you like it📸Free to try — upload a phone photo and preview your AI-processed result. Pay ¥200 only if you like it📸Free to try — upload a phone photo and preview your AI-processed result. Pay ¥200 only if you like it📸Free to try — upload a phone photo and preview your AI-processed result. Pay ¥200 only if you like it📸Free to try — upload a phone photo and preview your AI-processed result. Pay ¥200 only if you like it
Japanese ID Photo Face Position: 0.1mm to Pass Any Spec
In Japan, passport, My Number and residence-card photos share a tight 4mm face tolerance (ICAO Doc 9303). Hit 0.1mm with AI for ¥200, print at a konbini.
In Japan, sent back at the passport counter with “it doesn’t meet the spec,” asked to resubmit after My Number’s automatic check flags it “out of spec” — the root cause is almost always a face position that’s off by a few millimeters, a dimensional gap that’s hard to spot by eye.
±2mm
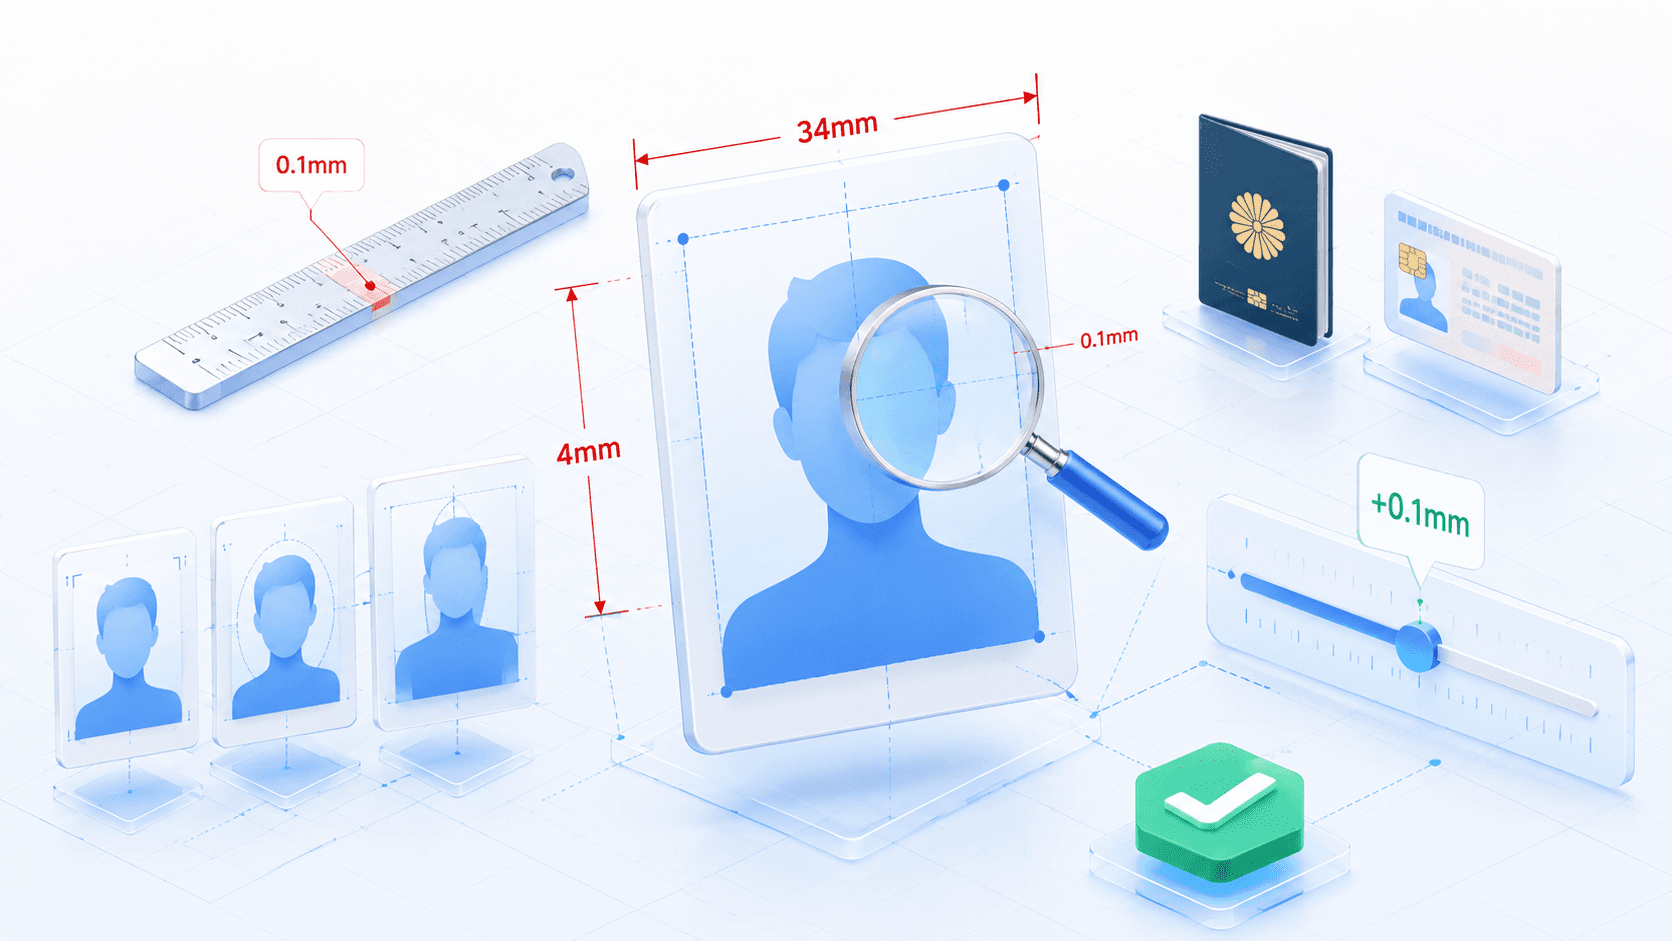
The passport, My Number card, residence card and Schengen visa all share a tolerance of face height 34±2mm (32–36mm) and crown margin 4±2mm (2–6mm). The tolerance is barely under 4mm — a figure that’s easy to miss with a photo booth built around a standard build, or with a by-eye selfie.
This article organizes the official information from the Ministry of Foreign Affairs, the Digital Agency, the Immigration Services Agency and various embassies, and explains the face-position figures for 9 major specs, the ICAO international standard, and the concrete steps to align a home photo to 0.1mm precision. It lays out a path to a spec-compliant photo at less than half the price of a photo booth or studio: ¥200 to shoot + ¥30 for a konbini L-size print = ¥230 total.
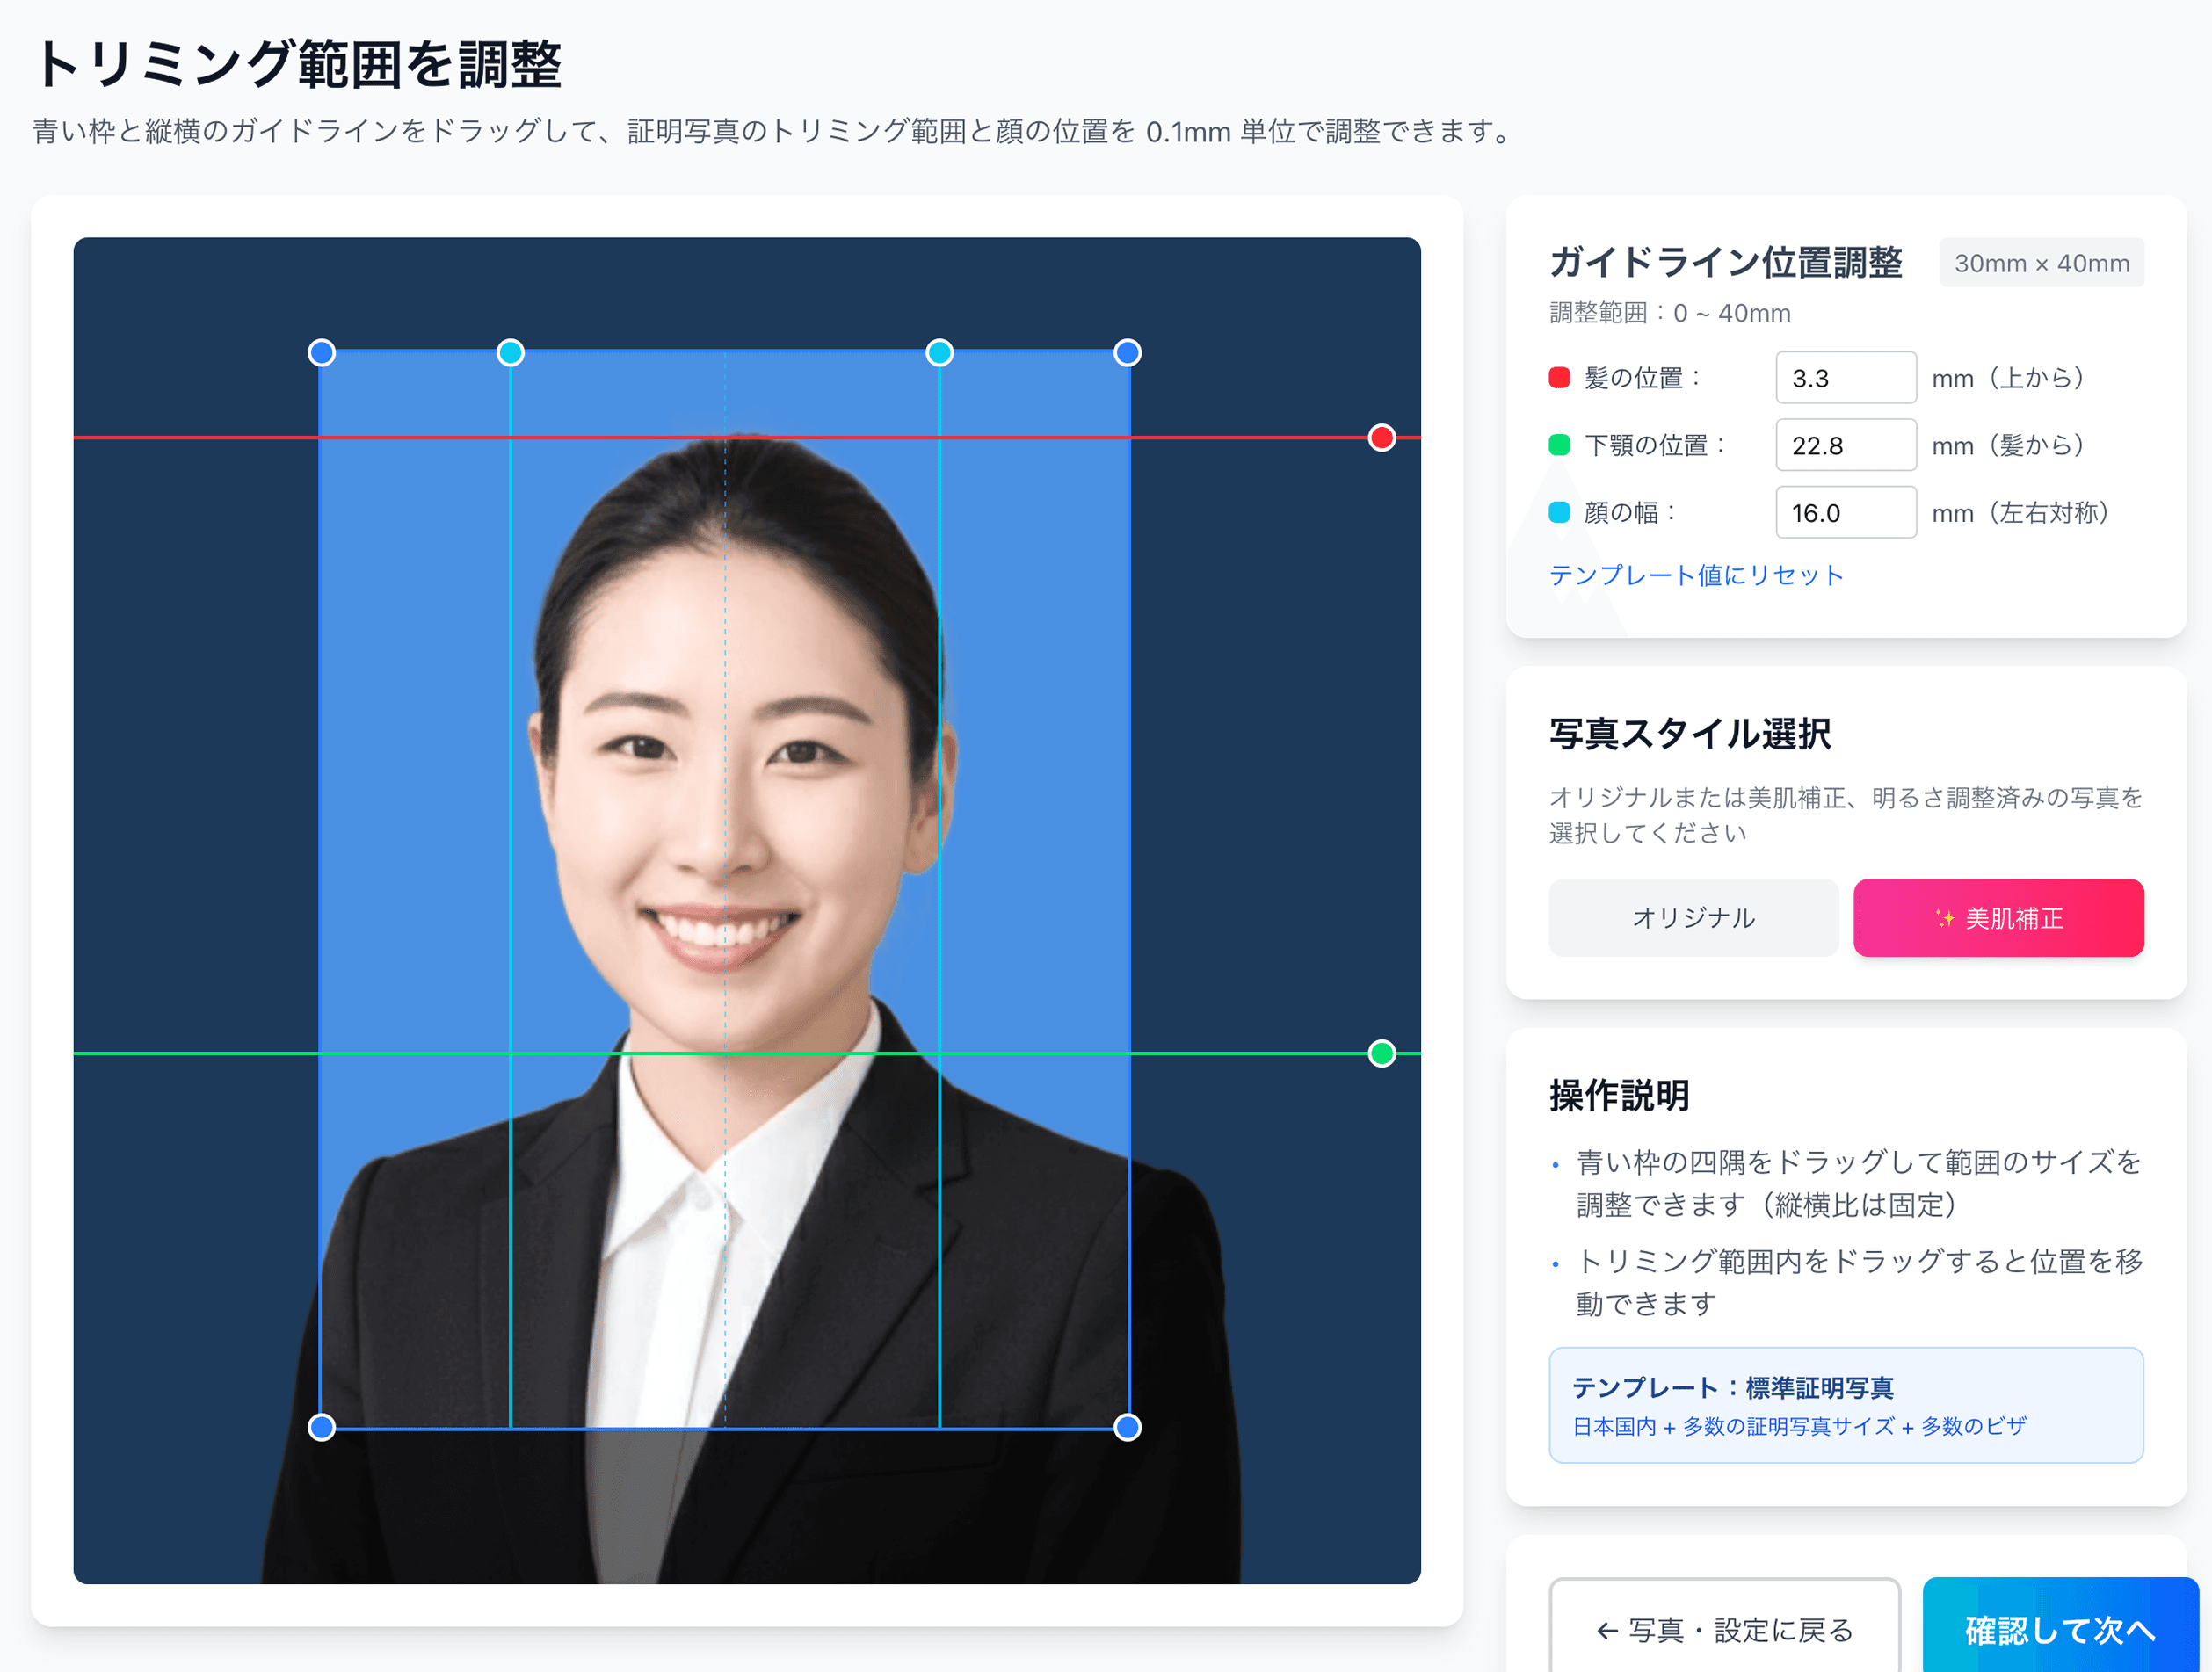
This is the actual adjustment screen. Align to the red = hairline, green = chin, cyan = face width guide lines and simply type the millimeter values you want, and you can align the face position to each spec in 0.1mm increments. Photo booths at the station and other apps do not show you the exact face position in millimeters ── with Ramune, “see it, align it, output it” is completed on a single screen.
Why “millimeters” are the heart of an ID photo
ID-photo specs aren’t about appearance; they are specifications of physical measurements that must withstand machine reading. The automated gates at immigration, the photo region of a My Number card, the printing on a driver’s license — all of them run on the premise of spec-compliant dimensions.
That’s exactly why a level of “looks about right to the human eye” doesn’t cut it. Passport centers keep transparent spec templates on hand for judging, and they physically check whether the face height spills outside the frame lines or the crown margin falls outside the designated range. For the online My Number card application on Mynaportal, an automatic dimension check runs at upload, and if the photo is judged out of spec, you get a notice asking you to resubmit.
I took an ID photo, but the center of the photo came out fairly off. (Off enough that you can tell at a glance.) I want to use it for job hunting — should I just reshoot it?
— Yahoo! Chiebukuro · q14191693659 · ID photo spec question
At the root of this question, too, is “a gap of a few millimeters.” If you align it to 0.1mm precision on screen after shooting, you incur neither the cost nor the time of a reshoot.
Face-position figures for 9 major specs
For the 9 official specs most in demand within Japan, here are the figures for photo size, face height and crown margin. Every figure has been verified against official sources.
Face-position standards for 9 major specs (as of May 2026, verified against official sources)
Passport
35×45mm / face height 32–36mm / margin 2–6mm
Per Ministry of Foreign Affairs & ICAO Doc 9303
My Number card
35×45mm / face height 32–36mm / margin 2–6mm
My Number Card portal (same standard)
Residence card
30×40mm / face height 32–36mm / margin 2–6mm
Immigration Services Agency
Schengen visa
35×45mm / face height 32–36mm / margin 2–6mm
Per EU Regulation 810/2009 & ICAO 9303
Driver’s license
24×30mm / face height not specified
Police (face size operated as an “appropriate range”)
Resume / CV
30×40mm / face height not specified
Ministry of Health, Labour and Welfare sample form (industry norm 24–28mm)
U.S. visa
51×51mm (2×2 inch) / face height 25–35mm
U.S. Department of State (no glasses)
Chinese visa
33×48mm / face height 28–33mm
Chinese Embassy & CVASC
Korean visa
35×45mm / face height 25–35mm
Embassy of the Republic of Korea in Japan
The international standard set by ICAO Doc 9303
The Doc 9303 “Machine Readable Travel Documents” issued by ICAO (the International Civil Aviation Organization) is the document that unifies the specs for passports and travel documents around the world. Japan’s passport, Schengen-area visas and many other international travel documents define the physical specifications of the face photo in accordance with this standard.
The reason Doc 9303 sets 32–36mm / 2–6mm is that the facial recognition at automated gates is premised on detecting facial feature points (eyes, nose, mouth) at fixed coordinates. Too large and the ears and chin tip run off the frame, making recognition impossible; too small and detection accuracy drops. The 4mm tolerance is a figure established to absorb differences in build, age and photographic equipment across countries.
4 reasons mm precision goes wrong
So why is it hard to produce a photo with mm precision at a photo booth, with a selfie, or at a studio? The causes boil down to the following four.
How a ¥200 AI tool achieves 0.1mm precision
Ramune AI ID Photo doesn’t demand precision at the shooting stage; instead, with a setup that does the 0.1mm adjustment on screen after the shot, it sidesteps all four causes at the root. For the shot, a single smartphone at home, in front of a white or pale-gray wall, is plenty.
1
Pick a spec and upload the photo
Select the one you need from more than 105 specs. The AI automatically holds the midpoint of the selected spec (for a passport, face height 34mm / margin 4mm) as the reference value.
2
The AI detects the face and body outline
A face-detection model acquires the coordinates of both eyes, the nose, the mouth, the chin tip and the crown, and a background-removal model cuts out the body outline pixel by pixel. Up to here it’s fully automatic and finishes within 5–10 seconds.
3
Provisionally place the face at the spec’s midpoint
The detected face coordinates are laid out automatically to match the selected spec’s midpoint (for a passport, face height 34mm / margin 4mm). At this point it’s already centered within the tolerance, and it’s not unusual for no further adjustment to be needed.
4
Fine-tune in 0.1mm increments on the preview screen
With the slider on the preview screen, you can specify where in the 2–6mm range to place the crown margin and where to align the face left-to-right, in 0.1mm steps. If you go outside the tolerance, the guide color turns red, so you can see visually which way to go back.
5
Reshoots are unlimited, before and after payment
If anything bothers you in the preview, you can re-upload a different photo. No extra charge applies even after the ¥200 payment, so you can adjust as many times as it takes to be satisfied. Unlike a photo booth, you can search for the optimal result without worrying about reshoot costs.
Align to every spec at 0.1mm precision — ¥200 to shoot + ¥30 to print = ¥230
For less than a single photo-booth reshoot (¥700–¥1,500), the mm-level adjustment is done on screen after the shot. Reshoots are unlimited before and after payment, and you can lock in the print data once you’re satisfied with the fine-tuning.
On the preview screen you can adjust the face position independently along the following three axes. Moving one axis at a time to align to the tolerance midpoint is the most reliable procedure.
The role of the preview screen’s three-axis adjustment
Vertical (vertical slider)
Where in the 2–6mm range to place the crown margin
Midpoint of 4mm recommended
Horizontal (horizontal slider)
Where to place the face left-to-right relative to the photo center
Keeping the left and right margins symmetric is the baseline
Scale (zoom)
Where in the 32–36mm face-height range to set it
Midpoint of 34mm recommended
Recommended face-position values by spec
For the 9 major specs, here are the midpoints (recommended values) that Ramune AI applies as initial values, alongside the spec’s tolerance range. If you’re unsure on the preview screen, simply adopting the recommended value first minimizes the chance of being rejected at the counter.
Recommended face height & margin by spec (midpoints)
Passport
Recommended face height 34mm / margin 4mm
Tolerance: 32–36mm / 2–6mm
My Number card
Recommended face height 34mm / margin 4mm
Tolerance: 32–36mm / 2–6mm
Residence card
Recommended face height 34mm / margin 4mm
Tolerance: 32–36mm / 2–6mm
Schengen visa
Recommended face height 34mm / margin 4mm
Tolerance: 32–36mm / 2–6mm
U.S. visa
Recommended face height 30mm (midpoint)
Tolerance: 25–35mm, no glasses
Chinese visa
Recommended face height 30.5mm (midpoint)
Tolerance: 28–33mm
Driver’s license
Keep an “appropriate face size” by screen proportion
No explicit mm figure
Resume / CV
Recommended face height 26mm (midpoint of the 24–28mm industry norm)
No explicit mm figure
Korean visa
Recommended face height 30mm (midpoint)
Tolerance: 25–35mm
Ramune AI ID Photo applies these recommended values automatically when you select a spec. If you don’t change the values in the preview, the print data is locked in at the midpoint.
7 common “off by a few mm” cases
Here are 7 representative examples of the “off by a few mm” issues actually flagged at passport centers, My Number counters and visa application counters.
A 7-point post-shoot mm-precision checklist
Before you lock in the print data, be sure to check the following 7 items. If even one thing bothers you, you can make a 0.1mm-increment correction on the preview screen.
Align to the millimeter — ¥230, cheaper than a single photo-booth run
¥200 to shoot + ¥30 for a konbini L-size print = ¥230 total. The AI provisionally places the face at the spec’s midpoint, and you do the final 0.1mm fine-tuning on the preview screen. It’s cheaper than a single photo-booth reshoot (¥700–¥1,500), and reshoots are unlimited even after payment.
Does that “0.1mm precision” really hold up in the printed photo too?
On screen you can adjust the position in 0.1mm increments, but the precision of the final print depends on the output resolution of the convenience-store multi-copy machine (typically 300–600 dpi). When printing L-size at 300 dpi, 1mm is represented by about 11.8 pixels, so even a 0.1mm on-screen adjustment reliably comes through as a difference of more than one pixel. The 1mm-level misalignments that get flagged at the counter as “off by several millimeters” are easily prevented if you can adjust in 0.1mm increments on screen.
I heard the main Japanese ID-photo specs have nearly the same face height and crown margin. Is that true?
It is true. The passport, My Number card, residence card and Schengen visa — all four — use the exact same figures: face height 32–36mm (34±2mm) and crown margin 2–6mm (4±2mm). This is because the machine-readable standard of the International Civil Aviation Organization (ICAO Doc 9303) is invoked as a common reference. By contrast, the driver’s license uses a smaller photo size of 24×30mm, the U.S. visa is a 51×51mm square, and the Chinese visa specifies a face height of 28–33mm — the figures differ from spec to spec.
A photo booth fixes the position by machine, so isn’t it accurate enough?
Photo booths are designed around a standard build, so anyone whose seated height, shoulder width or face size is far from average can end up with a face position outside the spec even with the seat raised to maximum. On top of that, because you release the shutter yourself while watching the monitor, there’s almost no room to reposition mid-shoot, and the reshoot fees (¥700–¥1,500 each) pile up. With an AI tool you can adjust in 0.1mm increments on screen after shooting, so you can land on the spec’s midpoint regardless of your build.
When I shoot at home and then tidy it up with AI, how precise does the initial shot need to be?
It’s enough if the crown of your head fits within the frame and everything from the shoulders up is captured. The AI tool automatically detects the face and body outline, replaces the background with white, and repositions the face in the preview. As long as there’s no major problem — facing extremely to the side, eyes closed, half the face out of frame — your positioning at the moment of the shot doesn’t need to be precise. The post-shoot adjustment is where the “several-millimeter precision” really happens.
After I adjust by 0.1mm on screen, won’t the print come out slightly off?
We use a layout that arranges multiple 35×45mm photos with cut marks on an L-size print (89×127mm). Because the cut marks are etched in as part of the print data, the position you locked in on screen is reproduced as-is in the print, aside from any human error when cutting. If you output with the printer’s color correction and scaling turned off, it normally stays within ±0.5mm of the spec’s midpoint.
Do passport centers and My Number counters really inspect down to the millimeter?
At passport centers it’s common for the counter to lay a transparent spec template (a plastic plate) over the photo to judge it, physically checking whether the face height spills outside the frame lines or the crown falls outside the designated range. For the online My Number card application on Mynaportal, an automatic dimension check runs at upload, and if the photo is judged out of spec, you get a notice asking you to resubmit. The reality is that “close enough is fine” does not pass.
Do I need special photography equipment to achieve 0.1mm precision?
No, you don’t. A single smartphone plus a white wall or a white sheet is enough. The AI tool automatically handles face and body outline detection, background replacement and provisional face positioning, and the user only does the final fine-tuning with a slider on the preview screen. No tripod, studio lighting or professional-grade camera is required.
Can AI handle a unique standard like the Chinese visa’s 28–33mm face height too?
Ramune AI ID Photo has more than 105 specs built in, and when you select a spec, the midpoint of that spec’s face height and margin is applied automatically. Choose the Chinese visa and the AI provisionally places it at the 33×48mm size and at 30.5mm — the midpoint of the 28–33mm face-height range — which you can then fine-tune on the preview screen. It covers all the major destinations, including the U.S. visa (51×51mm square), the Schengen visa (35×45mm), the Korean visa (35×45mm, face height 25–35mm) and the U.K. visa.
Before the counter says “it’s not aligned to the millimeter” — get ahead of it for ¥230
¥200 to shoot + ¥30 for an L-size print. The midpoint of the spec, compliant with ICAO Doc 9303, is applied automatically, and only the final fine-tuning is done with a slider on screen. Reshoots are free, as many times as you like, even after payment.