Contents
- 01Why glasses glare causes reshoots
- 02The 4 agencies’ rejection rules, side by side
- 03Techniques 1–3: pre-shoot prep (frame & coating)
- 04Techniques 4–5: lighting angle and head tilt
- 05Technique 6: how to decide whether to take glasses off
- 06Technique 7: AI post-correction to 0.1mm precision
- 07Deciding to reshoot when glare remains
- 08FAQ
In Japan, “rejected by My Number for glare” and “a reshoot at the passport center cost me half a day of paid leave” are common stories — glasses glare is aclassic defect that every major spec treats as an official rejection. The lighting in station photo booths and indoor fluorescent lights are positioned so the light hits the glasses at an angle that reflects easily, so “a quick wipe will do” doesn’t settle it.
This article explains the physics of glare, the four agencies’ rejection rules side by side, and 7 techniques coveringpre-shoot prep, your posture during the shoot, and AI correction afterward. They apply equally to a smartphone selfie, a station photo booth or a photo studio. For specs, see thelist of 105 supported specs; for printing, see theconvenience-store printing steps.
Why glasses glare causes reshoots
Reflections off a glasses lens come in two kinds: the reflection that returns to the camera off the front of the lens, and the one that returns to your eyes off the back. The cause of the “eyes can’t be seen” verdict in a Japanese ID photo (証明写真) is the former.When the angle of the light and the position of the camera become exactly symmetrical, the lens acts like a mirror, and the strong reflected light hides the eyes.
An uncoated lens bounces backabout 4% of the light at the front surface, and around 8% across both surfaces(the thinner the lens, the stronger the glare tends to be). TheAR coating (anti-reflective coating)used on recent glasses works by having a nanometer-thin film cancel out the reflected light, dropping visible-light reflection to 1–2% (though it doesn’t disappear entirely).
In other words, a shoot aimed at zero glare isn’t about “wiping” but about “shifting the angle.” On Yahoo! Chiebukuro, too, similar questions about glasses-on ID photos keep coming in.
It’s for a passport photo, but I want to take it with my glasses on. I heard that if they reflect, the passport can’t be made. I really want a photo with my glasses on. Is that possible?
The Best Answer to this question was: “Glasses photos aren’t actually disallowed. It’s just that they take some care, so on that front they’re simply not recommended. If you have a specialist photo studio shoot it, they basically won’t reflect.”“Not prohibited, but a high probability of a defect”— this is the positioning common to every spec.
The 4 agencies’ rejection rules, side by side
The wording for why glasses are rejected differs slightly from spec to spec. If you know “which clause you tripped over” when you get sent back, the direction for your reshoot becomes clear too.
Passport (Ministry of Foreign Affairs)
Cites “glasses with light reflecting off them” and “glasses whose frame covers the eyes” as unsuitable examples.
My Number card (J-LIS)
Official rejection examples: “the frame covers the eyes,” “the frame is very thick and covers a large area of the eyes or face,” “light is reflecting off the glasses.”
Driver’s license (prefectural police)
Kanagawa Prefectural Police: “We cannot accept photos where the lenses are so heavily tinted or reflective that the eyes can’t be seen and identification is not easy.”
Residence card (Immigration Services Agency)
For residence-status photo specs as well, frame shapes that prevent the eyes from being confirmed, and reflections off the glasses, are not accepted in practice.
With the My Number card and driver’s license in particular, the “eyes can’t be seen” state is caught not by a clerk’s judgment but by an automated check, so the defect-notice rate for online applications runs high. We covered the main causes behind My Number online re-applications in detail inwhy 80% of My Number online photos fail.
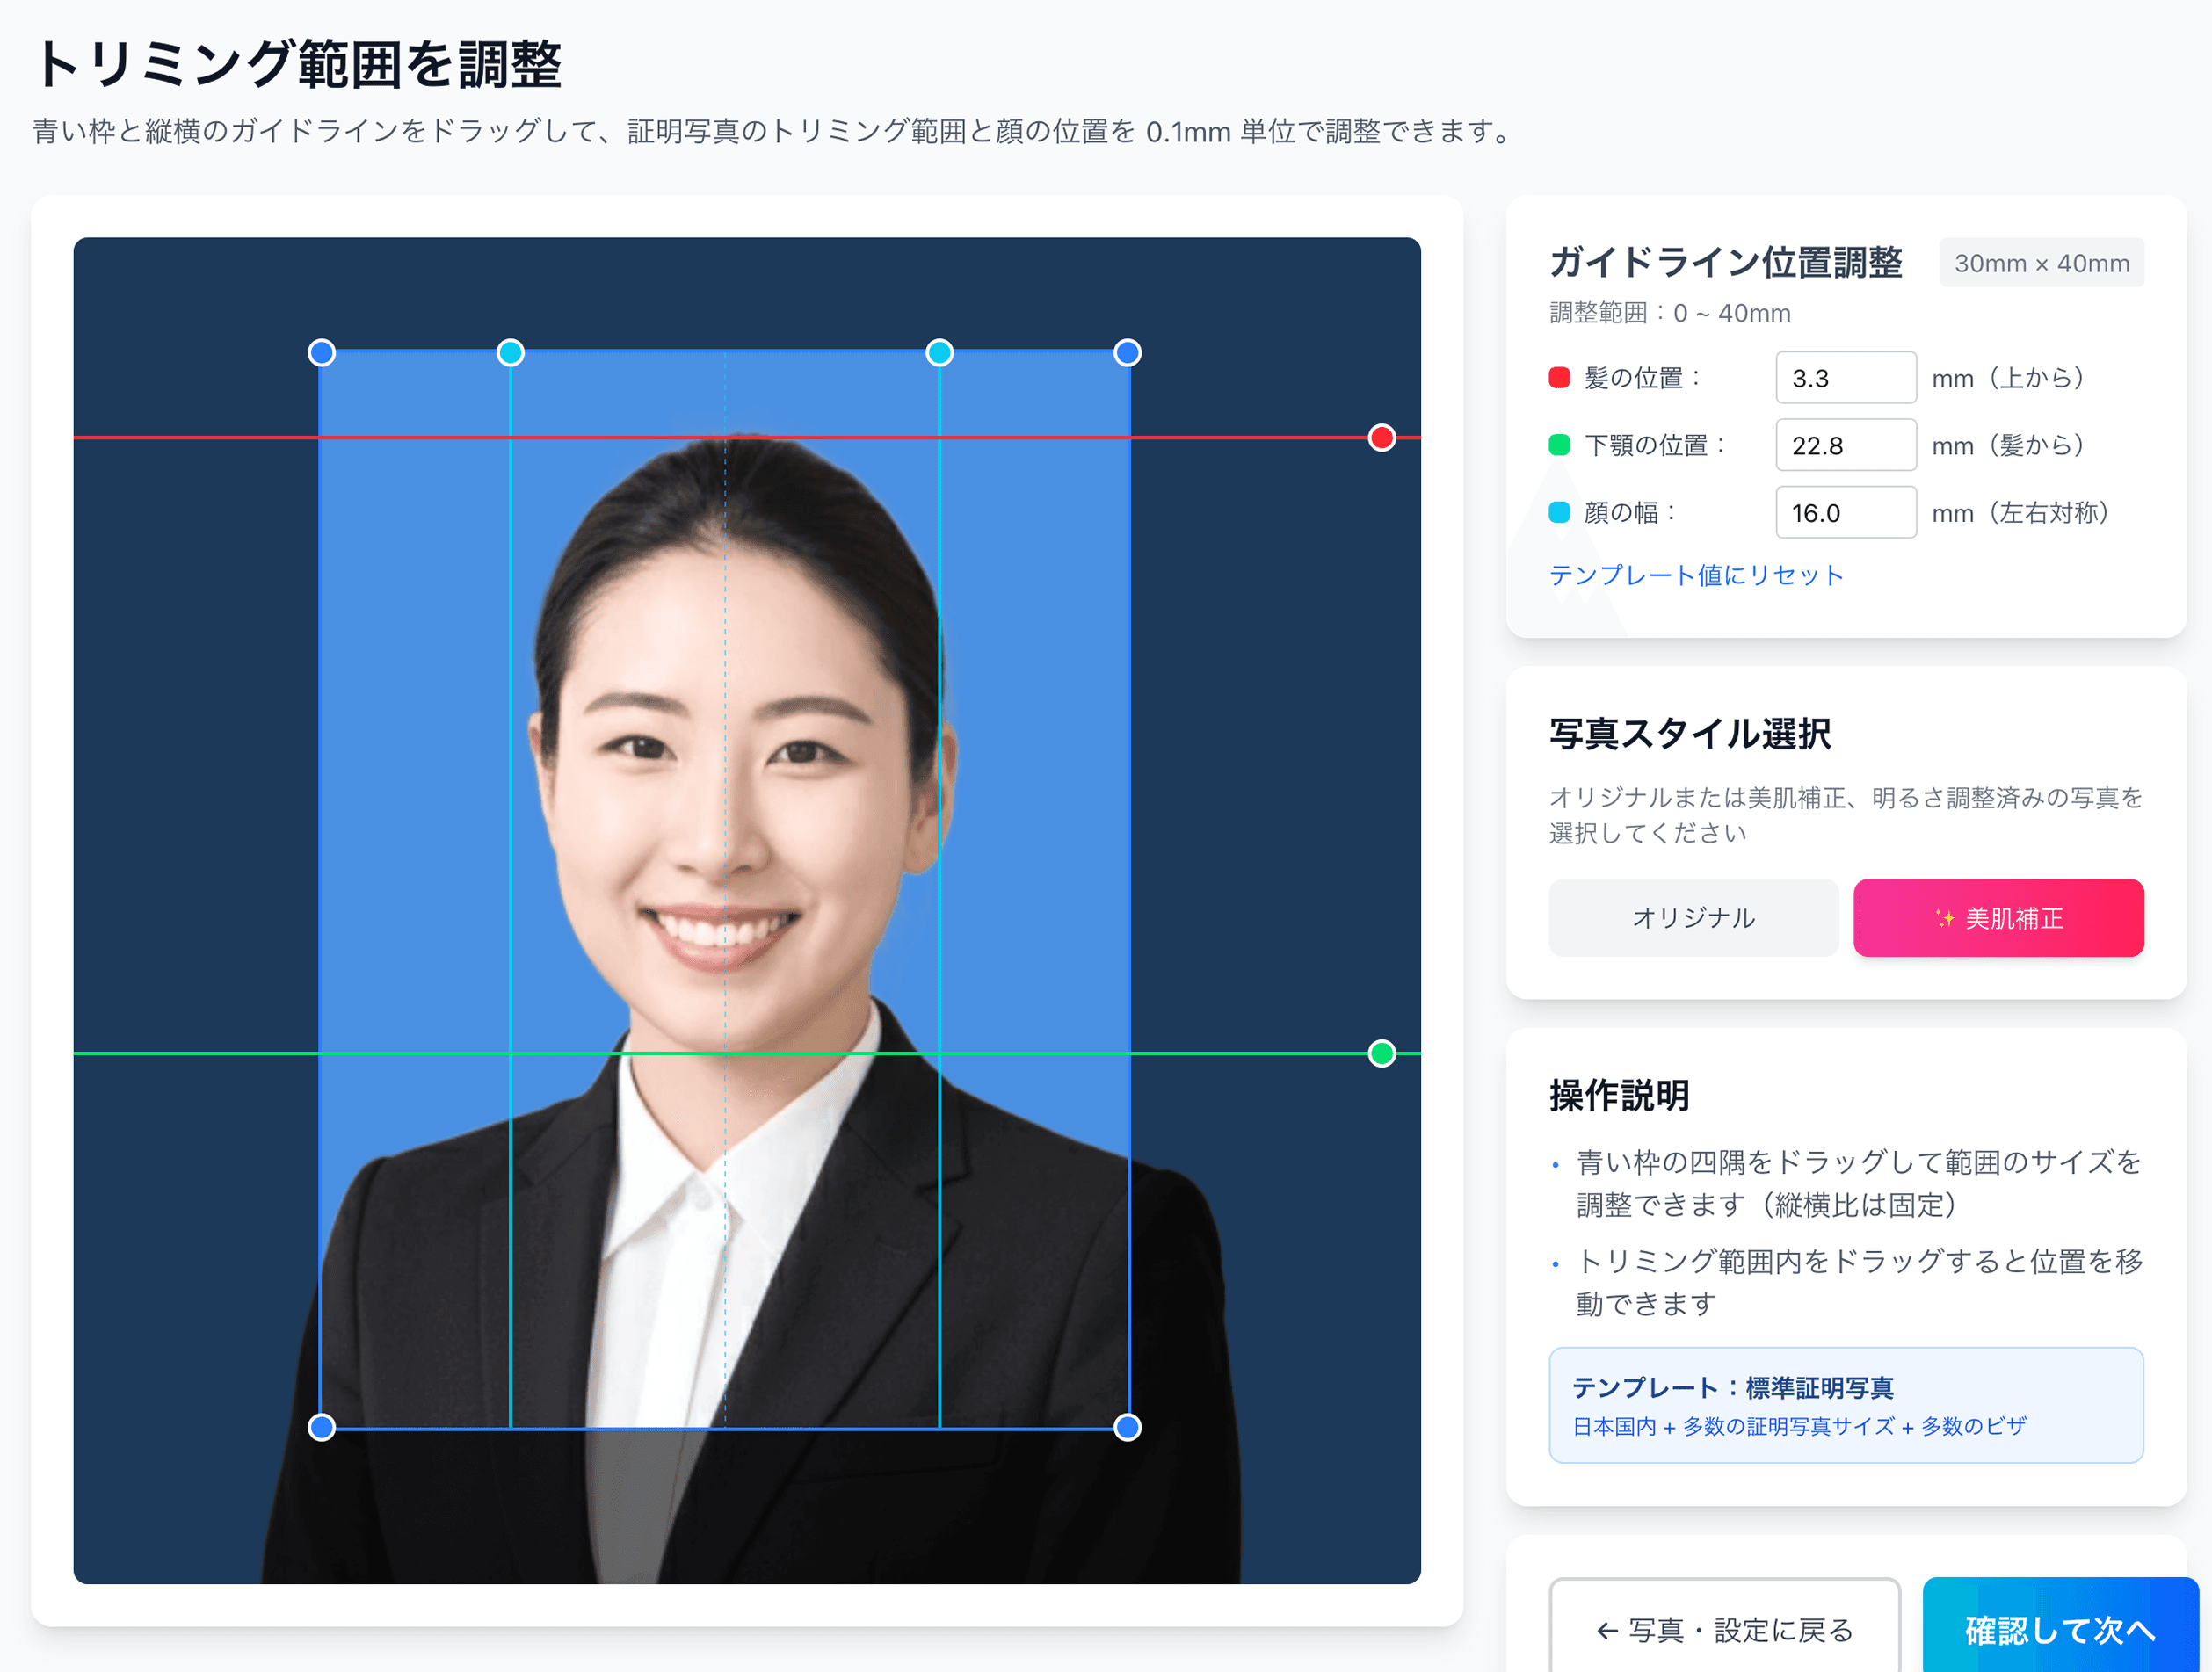
Clear all 4 agencies’ rejection rules at 0.1mm precision
Ramune AI ID Photo has a position-adjustment screen that matches the specs of all four agencies, lining up your chin position, the headroom above the crown and your eyeline down to the millimeter, while letting you compare with-glasses and without-glasses photos before you print. Reshoot as many times as you like for ¥200.
Create a spec-compliant photo for ¥200Techniques 1–3: pre-shoot prep (frame & coating)
The prep you can do before the shoot starts decides most of the result. The three techniques here require no buying new glasses — they’re done entirely by “using the right pair” from glasses you already have on hand.
- 1
Technique 1: prepare a spare pair with thin rims
If your everyday glasses have thick rims or heavily tinted frames, switching just for the day of the shoot to “an old pair with thin rims,” a “half-rim” or a “rimless” pair is the surest measure. It dodges in one move the My Number card spec’s rejection example, “the frame is very thick and covers a large area of the eyes or face.” You can either borrow from family or relatives, or keep one cheap spare from the likes of JINS or Zoff on hand.
- 2
Technique 2: raise the nose pads and tilt the temples (arms) down 1–2°
Having a glasses shop adjust them is ideal, but if you do it yourself, finely tweak the nose pads slightly upward so the lens surface tilts down a few degrees. The more the lens surface faces downward, the more the reflection from the ceiling light escapes toward the floor and doesn’t return to the camera. The fit drops off a little, but once the shoot is over you just put them back.
- 3
Technique 3: swap blue-light-cut or tinted lenses for plain ones
Blue-light-cut lenses carry a coating that reflects blue-to-violet light, so when you shoot with a flash, an unnatural blue or violet reflection appears. Switching just for the day of the shoot to “a plain spare pair,” “an old uncoated pair” or “a frame you used to use” covers both the spec side and the glare side. Note too that photochromic (color-changing) lenses and UV-cut types that pick up a tint tend to retain their color when shot outdoors.
Techniques 4–5: lighting angle and head tilt
The elements you can adjust during the shoot are, in practical terms, the two of “lighting angle” and “face angle.” Both change the angle at which light hits the lens, and have the effect of steering the reflected light away from the camera.
- 1
Technique 4: place the light not straight above the face but at 30–45° up and to the side
When you shoot a selfie at home, pointing a ring light or ceiling light straight at your face tends to send the light that bounces off your glasses right back into the camera.Light the face not from dead ahead but from 30–45° up and to the side, or aim the light at a white ceiling or wall to bounce (diffuse) it, and the light reaching the glasses spreads out and softens, greatly reducing sharp reflections. Even for a smartphone selfie, just taking in soft front light from a window at an upper-side angle and dropping the room lighting a notch makes a visible difference.
- 2
Technique 5: tuck your chin 1–2° and fix your eyeline at the center of the lens
Changing your face angle moves the relationship between the lighting and the camera relative to the glasses lens together.Just tucking your chin slightly and fixing your eyeline at the center of the camera lensgathers the ceiling light into a small spot near the top edge of the lens, so no reflection lands on the center of the eye. Conversely, tilting your chin upward makes the entire lens bounce the ceiling light straight back, falling into the pattern where the eyes disappear completely. If your eyeline tends to drift upward, you can make up for it with Technique 7 below (fine position adjustment by AI).
Technique 6: how to decide whether to take glasses off
Under all four agencies’ specs, a photo taken with the glasses off is accepted without issue. We often hear the worry “I wear them daily, so won’t I look like a different person without them?,” but what matters in identity verification is theoutline of the face, the features, and the shape of the ears— not whether you have glasses on.
About glasses in ID photos. I’m about to get a certain qualification and need an ID photo. Since I normally wear glasses, is it okay to keep them on when I take the ID photo too?
The Best Answer to this question was organized like this: “There are basically no prohibitions on ID photos taken with glasses on! But ID photos where light is reflecting off the glasses, or where the rim hides the eyes so they aren’t clearly visible, or the frame covers the eyes, are unsuitable as proof of identity!” The criteria for deciding whether to take them off, drawn from this, are as follows.
For the ID photo for a university application, I took it without glasses because I thought reflections would be a problem, but on the image-upload screen a note came up saying people who wear glasses during the exam should shoot with their glasses on.
Answer (Best Answer summary): During the exam, the proctor patrols between the desks and checks each candidate’s face against the photo. If the glasses differ between the photo and reality, you risk being spoken to and told to take them off — losing time — as well as being unable to concentrate, on edge wondering when you’ll be approached. — When your admission ticket specifies wearing them, the right move is to follow that instruction and use shooting techniques that suppress glare.
Technique 7: AI post-correction to 0.1mm precision
For adjustments you can make after the shoot, AI-based tools are well suited. Ramune AI ID Photo, working from a single photo taken on your smartphone, has anadjustment screen that can move the center of the face and the headroom above the crown in 0.1mm increments. Into the few-millimeter tolerances set by the My Number card spec — “34±2mm from chin tip to crown,” “4±2mm from the crown to the top edge of the photo” — you can fit it down to the pixel.
The Ministry of Foreign Affairs spec’s “not differing markedly from the normal facial appearance” applies to AI correction too. Ramune AI ID Photo does not “reconstruct” a photo where the eyes have been completely erased by reflected light, and in that case recommends a reshoot. A photo where the face position is off by a few millimeters, on the other hand, can be moved within spec, cutting out one reshoot.
With glasses, without, a different angle — try them all on a single payment
After the ¥200 payment, reshoot as many times as you like. AI lines up the face position in 0.1mm increments, and even if glare remains on the glasses you can reshoot and compare. Automatic QR-code issuance for convenience-store printing, with support for 105 specs including My Number, passport and resume.
Create an AI ID photo for ¥200Deciding to reshoot when glare remains
Even after trying all 7 techniques, a photo where the entire eye is hidden by reflected light can’t be saved by AI post-correction either. Here we lay out the cases where, in the end, choosing to reshoot is faster.
When a reshoot becomes necessary, the most cost-efficient option is the combination of a smartphone and an AI tool. A station photo booth is ¥700–¥1,500 per run, with a cost for every reshoot, but an AI tool lets you reshoot as many times as you like on a single ¥200 payment. Even including a convenience-store L-size print at ¥30–¥40 per sheet, it’s finished for ¥230–¥240 total. For the printing-side comparison, seeconvenience-store ID photos: a thorough comparison of the 5 major chainsand theconvenience-store printing steps.
Related links
- List of 105 supported specs
- 12 passport rejection patterns
- Why 80% of My Number photos fail
- Job-hunting photos & recruiters’ honest take
- Convenience-store printing: 5 chains compared
- Convenience-store printing steps
- Pricing details
References
- My Number Card Portal, “Points for the face photo when applying” (J-LIS)kojinbango-card.go.jp
- Ministry of Foreign Affairs, “Photo specifications for IC passport applications”mofa.go.jp
- Kanagawa Prefectural Police, “About the photo to bring for driver’s license renewal, etc.”police.pref.kanagawa.jp
- Immigration Services Agency, “About photo specifications”moj.go.jp/isa
FAQ
Is it okay to take an ID photo while wearing my glasses?
Will wiping the lenses before the shoot really cut the glare?
Should I take off blue-light-cut or tinted lenses?
If I shoot without glasses, will they say “the photo doesn’t match the real person”?
Can the reflected part on my glasses be removed with AI after the shoot?
If I keep redoing the shoot over glasses glare, how much does the cost add up?
From ¥230 — under half the price of a station photo booth, with unlimited reshoots
¥200 (shooting + spec adjustment) + ¥30–¥40 for a convenience-store print, from ¥230 total. That’s under half the ¥700–¥1,500 of a station photo booth, and one-tenth of a photo studio’s ¥3,000–¥10,000. Reshoots after payment are unlimited and free.
Create yours now (¥200)Ramune Editorial ・ Published: May 16, 2026
Facts in this article are verified against primary official sources before publication.